- Get a solid core door slab (slab preferred over pre-hung)
- Determine right split, cut the door in half
- Build shelf onto lower door section
- Measure and cut hinge mortise on door
- Lay out jamb and transfer hinge mortise locations to jamb
- Drill lockset
- Assemble Jamb around door
- Install
Specific tools needed:
- Router (I’ve been using a simple trim router for all of this work)
- Door Mortise Kit
- Lockset Jig
- Jamb kit (ex: http://www.homedepot.com/p/Woodgrain-Millwork-11-16-in-x-4-9-16-in-x-81-in-Primed-Finger-Jointed-Interior-Flat-Door-Jamb-Set-includes-pre-cut-header-and-sides-10001398/202089273) TIP: Make sure you use a finger-jointed pine jamb and not MDF, the MDF has too much flex for the weight and floppy-ness of the two door halves.
- Dutch door bolt – Deltana seems to have some quality hardware.
- Plug for MyKnobs.com: at this point I’ve ordered all new interior Schlage door knobs at an excellent price from MyKnobs.com. I’ve literally ordered 20 knobs from them and a ton of door hardware for my basement work. This is where I got my specific door bolt: http://www.myknobs.com/delddb425u15.html)
- Also available on Amazon Deltana DDB425U26D HD Solid Brass 4-Inch Dutch Door Bolt
- 4 Hinges (3 1/2″) – MyKnobs.com has nice sets of schalge 3 1/2″ radius hinges, although I got this set at Home Depot (3 pack + single)
Get a Solid Core Door
I found a bunch of good door slabs at a local building salvage, the one I eyed for the dutch door was a 6-panel, solid core door. You’ll want solid core so you can cut it in half at any point, and don’t have to fight with a hollow-core. Preferable if you can get one that doesn’t have the locks drilled or hinges mortised yet. The size should match whatever the current door is, standards are usually 80″ high, and 28, 30, or 32″ wide. I ended up with a door 1″ shorter (79″) than the current normal door, knowing I’d be adding a shelf and could make up the extra 1″ that way.
Cut the door in Half
Determine where you should cut the door in half, some factors to help decide might be:
- Matching door-knob height to your other doors, add enough room for your shelf
- Desired shelf height – add/subtract from there
- Style of door might dictate the best “look”
I found this guide to help give me some guidelines on what a dutch door “should” be: http://idighardware.com/2015/09/wwyd-dutch-door-coordination/, https://www.steeldoor.org/res/SDI_111.pdf. I ended up cutting it at 38″ from the bottom, adding a 1″ shelf, which would leave adequate clearance for my knob to be drilled at 35 1/2″. After fighting with clamps and make-shift fences for years with my Circular Saw, I finally got an edge clamp which makes things so much easier.
Build Shelf/Ledge
Depending on the thickness of your ledge, you might be making up height for a short door like mine, or need to trim some height from one of your door halves to accommodate it. There are lots of ways to attach it, i went with a direct attachment, an easier way might have been build a “U” shaped channel to fit over the bottom half but that adds bulk. I used a 2×4 I milled to the desired depth I needed to add, then rabbeted the shelf back to match the door thickness. I decided to add a few dowels, glue, then attach from the top with counter-sunk screws to which I added wood plugs.

What side should the shelf go on?
I think the way I did it might have been slightly non-standard, but the internet tells me there’s no real standard. I’ve seen it with the shelf extending to both sides, to the front, and back only also. I had the shelf protrude out from the back side of the door – or away from the inside of the jamb; this way I didn’t have to notch the shelf correctly to fit within the door-stops because that side of the door would still remain flat. This seemed like the easiest option.
Cut Hinge Mortise
I ended up using this random PDF to determine hinge locations: http://meskerdoor.com/pdf/Hinge_Locations/45_inch_Hinge_doors/Dutchdoorhingelocations.pdf, this is for 4 1/2″ hinges, which you’ll probably really only need 3 1/2″ hinges – four of them instead of 3.
- Top Half: Top of top hinge: 4 7/8″ from top of door
- Top Half: Bottom of bottom hinge 4 7/8″ from bottom
- Lower Half: Top of top hinge: 4 7/8″ from top
- Lower Half: Bottom of bottom hinge 6 7/8″ from bottom of door.
Mark all the hinge locations and mortise all the hinges.
Drill Lockset
Before you assemble the jamb around the door, now is the best time to prep the lockset. Drill your knob hole and for the lockset, then mortise the faceplate. You could also drill and mortise the strike-side of the jamb now too.
Build your Jamb
Next we’ll construct the jamb around the door, and end up with a pre-hung door assembly.
- Lay out your hinge-side jamb next to your door halves pushed together
- I didn’t end up making an artificial gap of any size – just pushed them together and left it
- I aligned the top of the jamb about 1/8″ higher than the top of the door for adequate space.
- Check your rough-opening height and trim your jamb boards now to the desired pre-hung height. (Ex: if your rough opening is 81 1/2″ high, but the jamb kit boards are 82″, you’ll want to cut them down to something like 81 1/4″.)
- Mark all the hinge locations onto your hinge-side jamb and mortise the hinges
- Attach the hinge-side jamb to the door halves by installing all of your hinges. TIP: If your hinge screws extend more than about an 1/8″ from the jamb you may want to cut these tips off before you try to lift it into your rough opening.
- Measure the top jamb piece considering adequate gap on either side of the door (1/8″-3/16″).
- Line up the strike and top jambs to the front of the door and nail them together at the top corner.

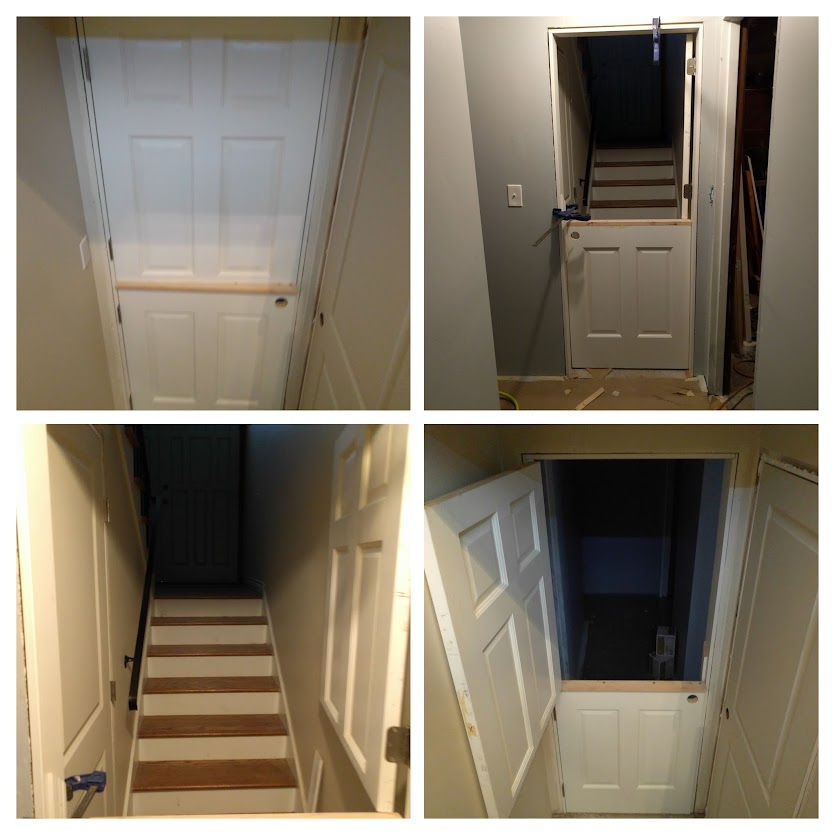
Install
I won’t cover all door-hanging basics, just what I found to be different with this dutch door. Now you likely have a very heavy, wobbly pre-hung dutch door. I nailed in a temporary door-stop on the strike side jamb where the two halves meet just to have something to keep it closed against. Most of installation is the same, except you’ll want to constantly check the swing of both door halves as you start nailing in your jamb.
- I used some clamps to keep the jamb in the doorway since I was doing this solo, you’ll need that to keep it in place if you let the top swing out while you work on the bottom.
- Start at the bottom – make sure your bottom half has adequate clearance from the floor and swings properly. Check level of the door and plumb of the jamb – within reason.
- Because I used an MDF jamb, I had a lot of flex in a few key areas that allowed for pivot-points when adjusting the door, these were at the lower-half top hinge, and near both hinges for the top half.
- Because I didn’t add the door stops at this point I used some counter-sunk screws to be able to adjust how far off the rough opening the jamb would be
- Play with tightening and loosening the screws to check the swing of both your upper and lower door.
- Thinking I could suck in the top corner to keep the top half high actually pulled the opposite corner in too much, and the outside corner of the top half would hit the corner of the jamb.
- Keeping the jamb as plumb/true as possible meant both halves swung free with proper spacing in the jamb.
- Once you’ve secured the hinge-side, start shimming out the rest of the jamb and nailing it in place – do constantly check your swing in case you pinch any area too much.
- The only friction was one of the wood plugs covering the shelf screw that needed to be sanded flat.
Countersink screws into the jamb – allowed for adjustments (will be covered by doorstop):

Temporary door-stoop:
")
Final Latches:

Photos show a coat of paint on the shelf and door itself, and the installation of the dutch door bolt. The Deltana bolt comes with two catches – one a surface-mount for if your shelf extends to the opening side of the door (vs strike-side like mine) and another recessed plate (as pictured). Pretty easy to throw on and makes it all work together!